VRM Web Group Functionality
The web group functionality is a way for you to categorize your properties in any way that is meaningful for your company to display on your website. The web group functionality only applies to the website and your website must be hosted by VRM and use VRM's online search and booking engine.
There is no limit to the number of web groups you can create and a property can exist in multiple web groups at the same time. For example, you may have a property that fits in a pet friendly category, in a specific city category, and in the condo category, etc.
Important NOTE: The "All Properties" web group is required for your website to function properly. This is the group that is searched when someone performs a date search from either your quick search or the advanced search page. You can change the "Name" but you cannot change the WebCode without resulting in breaking your website search functionality.
Get to the Web Group Screen by clicking System Configuration > Website > Web Groups
The Web Groups Screen
&border=1)
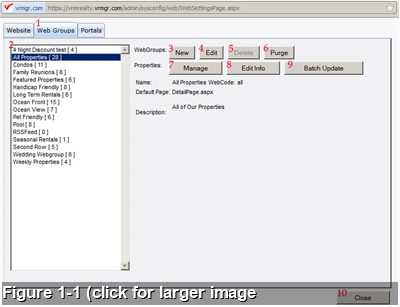
Figure 1-1 Explanation
- Web Group Tab: The highlighted tab shows which or the three tabs you are on.
- List: List of all webgroup that have been created. Click on a webgroup to select it for editing.
- New: Creates a new webgroup. See figure 1-2.
- Edit: Edits the information of the existing webgroup you have clicked on. See figure 1-2.
- Delete: Delete a webgroup. Can only be used if no properties are assigned to the webgroup, otherwise it is grayed out.
- Purge: This will remove all inactive/Archived properties from the webgroup that you have selected.
- Manage: Allows you to assign or remove properties from a webgroup. See Figure 1-3.
- Edit info: Allows you to edit the descriptions of individual properties assigned to the webgroup you have highlighted. See Figure 1-4.
- Batch Update: WARNING – This will update ALL property descriptions throughout all webgroups using the description found under the Properties tab under Manage Property>Edit>General tab. USE WITH CAUTION.
- Close Window.
New & Edit Buttons
&border=1)
Figure 1-2 Explanation
- Name: is the name of webgroup you are creating or editing. If you have a VRM search engine that is 4.x or newer, the name of the webgroup WILL become part of your title tag for the category page and you have the option of using it in the title tag for the property page. Use SEO friendly terms as this is one of the principle SEO on-page ranking factors. The name can be changed any time without interruption to the functionality of the website. Onl;y the title tag will change.
- WebCode: This is the link the between all the information entered here and the website. This webcode WILL show in the URL of both the webgroup page and the property detail page. It is limited to 30 characters. Because it will become part of your URL structure, choose your webcodes with care. Best practices for webcodes include:
- Use complete words
- Use keywords or descriptive words to describe the webgroup
- Use hyphens to separate words.
- Do not use underscores
- Do not use spaces
- Do not use special characters such as an apostrophe or exclamation mark.
- Example of good webcodes include: pet-friendly-rentals, oceanfront-rentals, captains-quarters-rentals, asheville-cabin-rentals, etc.
- DO NOT CHANGE the webcode from the "All Properties" webgroup. It must remain set at all.
- Once a webcode is set and there are links to the webgroup pages on your site, you cannot change the webcode without it resulting in a broken link.
- Default Page: This is the name of the page that contains the code for the layout of your individual property detail page. Every website comes with the default page set as DetailPage.aspx If you have a desire or need for different properties to have a unique layout, you can ask to have a separate page designed with a new name. You should leave this as is unless you have requested a unique layout. If request a new layout and change this after properties have been added, this will become the new default for any new properties assigned but WILL NOT re-assign the new page to properties that were already in the webgroup. You can assign the new page to each property on the property detail level. (See figure 1-4)
- Description: The description will appear on the website on the webegroup page. The field is html friendly. Information can be entered directly or you can use the wysiwyg editor. (For instructions on the wysiwyg, see our content management articles and look for WYSIWYG). Content Management System (CMS)
- Best SEO Practices for entering description.
- Include a Headline and make it a "header 1" from the wysiwyg or enclose in an h1 tag if entering html directly.
- Enter a short description about the webgroup. Use good keywords without overdoing it.
- Make each web group description unique.
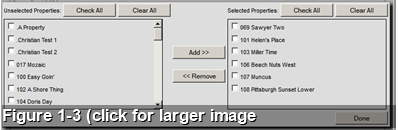
Manage Button
&border=1)
Figure 1-3 Explanation
- The left column are those properties that are not assigned to this webgroup while the properties in the column on the right are assigned and will show up on the website in the property list when the link to this website is clicked.
- You can add and remove properties to the webgroup by checking the white boxes next to a property's name and then click the "Add" or "Remove" buttons.
- NOTE: properties can exist in multiple webgroups without limit
Figure 1-4 Explanation
- Shows the list of properties that are assigned to this webgroup
- Shows the property detail layout page assigned to this property
- The short description is available to show on the website and shows on the search results and web group pages on online search engine (OLSE) version earlier than 4.0 but is not automatically assigned on any pages in version 4.0 or later. This description field is HTML friendly or you can use the wysiwyg editor.
- The long description is the description that shows on the property detail page (in the overview tab, if you are on OLSE version 4.0 or newer.) In the OLSE version 4.0 and newer, it also shows the first portion of the description on the search results page and the webgroup pages with a link to the full description on the property detail page. This description field is HTML friendly or you can use the wysiwyg editor. Tips for Managing and Writing Good Property Descriptions
- You have 3 options for saving changes.
- Just This Group: only saves the information for the current webgroup you are editing
- Descriptions-All Groups: saves the short description and the long description across all webgroups in the VRM system.
- All Fields-All Groups: this will save both descriptions and also save the web page that is assigned across all webgroups in the VRM system.
Revision 4.0