- "Is Clean" then it is BLACK.
- "Do Not Clean" then it is RED.
- "Needs Cleaning" then it is Yellow.
IF these words
are NOT part of the HK name at all - then it will default to BLACK.
I. The following new functionality has been applied to the Maintenance and Housekeeping work order grid windows.
A. User defined work order 'Category' functionality.
Category options are created by selecting the 'Edit Categories' button at the top of the work order grid. Selecting the 'Edit Categories' button opens the 'Add Category' window.
Category options are added to the VRM application by selecting the 'Add new Category' button, populating the required 'Category' description field, and selecting the 'Insert' button.
Category option values can be edited and deleted by selecting the 'Edit Categories' button. The existing category option list displays with the textual links 'Edit' and 'Delete' appearing next to each option.
When creating a new work order, a category option can be assigned to the work order.
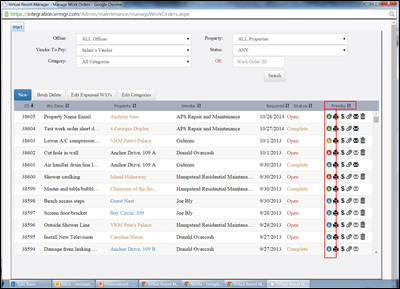
A new filter drop down menu named, 'Category', has been added to the work order grid providing the end user the ability to sort by the user defined category option assigned to each work order.
B. Resorting the work order grid.
Selecting a work order grid column header resorts the work order grid within ascending or descending order based on the value within the column.
C. Work order short description and vendor information pop up windows.
From the work order grid, placing the mouse cursor on the work order's short description will display an information pop up window containing the work order's full short description.
From the work order grid, placing the mouse cursor on the vendor name will display an information pop up window containing the vendor's full name and phone number.
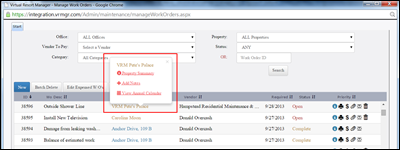
D. Viewing the property summary window, adding notes to a property, and viewing the annual calendar window from the work order grid.
Selecting a work order's property name from the work order grid opens a pop up window containing the 'Property Summary', 'Add Notes', and 'View Annual Calendar' textual links. Selecting any of the links will open the corresponding window.
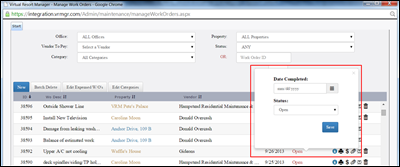
E. A work order's status can be updated from the work order grid.
Selecting a work order's status from the work order grid displays a status update pop up window. The status of a work order can be updated directly from the work order grid.
Please keep in mind when updating the status of a work order from 'Open' to 'Completed' or from 'Open' to 'Approved' a 'Date Completed' value is required.
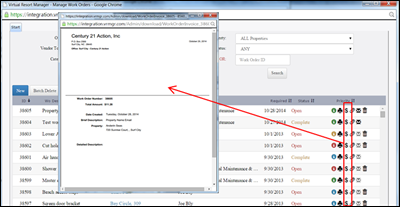
F. Work order information pop up window.
When the mouse cursor is placed on a work order's information image (i), a work order information pop up window displays.
The work order information pop up window displays the following information:
- Work Order Priority
- Work Order ID
- Property Name
- Account assigned to pay the work order
- Work Order Status
- Vendor(s) assigned to the work order
- Vendor Amount(s)
- Work Order Tax amount
- Work Order Tax Type (Sales Only, Room Only, Both)
- Total Cost/Bill of the work order
- If the work order has been printed
- if the work order has been viewed
- The date the work order was created
- The date the work order is required
- The work order property's housekeeping status
- The individual that created the work order
G. Printing a work order from the work order grid.
Selecting the printer image from the work order grid opens the work order pdf. At this time the end user can elect to print the work order.
H. Printing a work order invoice from the work order grid.
Selecting the dollar sign image from the work order grid opens the work order invoice pdf. At this time the end user can elect to print the work order invoice.
I. Attaching documents to a work order.
Selecting the paper clip image from the work order grid opens the work order attachment window. Multiple attachments can be attached to a work order. Work order attachments can consist of documents, images, etc.
Selecting the 'Choose File' button from the work order attachment window opens the end user's computer explorer window. The end user can search through their computer's files to locate the document they would like to attach to the work order.
Multiple attachments can be applied to a single work order. Selecting the paper clip for a work order with multiple attachments already assigned will display an attachment list within the work order attachment window.
Selecting the image of the arrow pointing down to a block will download the document or picture onto the end user's computer allowing for the document or picture to be viewed. Selecting the trash can image deletes the work order attachment. At any time a new attachment can be assigned to an un-expensed work order by selecting the 'New' button.
Placing the mouse cursor over the work order grid paper clip image displays a pop up window containing a count of the number of attachments assigned to the work order.
J. Emailing a work order to a vendor.
An envelope image displays next to each work order entry within the work order grid. The envelope image will display active for work order entries containing a vendor configured with an email address. The envelope image will display inactive for work order entries assigned a vendor without an email address.
Vendor email addresses are setup on the 'Manage Vendors' window. (Select the Maintenance main menu option > Select the Manage Vendors menu option > Highlight the vendor entry > Select the Edit button > Enter the vendor email address within the Email field)
Selecting an active envelope image from the work order grid will open the vendor email image.
The sender can manually apply a 'Sender' email subject value. This value will display in front of the sender's email address upon receipt of the vendor email.
The default sender email address is pulled from the 'Email Address' field on the 'Email Settings' tab of the company configuration window. The sender email address value can be manually updated.
Each vendor assigned to the work order will appear as recipient entries. The end user can manually remove/delete a vendor from receiving the work order email.
The email subject value will default as, 'Work Order ID: ######' The email subject value can be manually updated.
All attachments to a work order will be sent with the email. An attachment can be deleted from the email before sending.
The following default values display within the body of the email:
- Work Order Priority
- Work Order ID
- Property Name
- Account configured to pay the work order
- Work Order Status
- Vendors assigned to the work order
- Amount of the work order
- Total Work Order Amount
- Has the work order been printed
- Has the work order been viewed
- Work Order Created Date
- Work Order Required Date
- Work Order Completed Date
- Housekeeping Status
- Work Order Short Description
- Work Order Long Description
The default values within the body of the email can be manually updated, deleted, or reformatted. Additional text can be added within the body of the email.
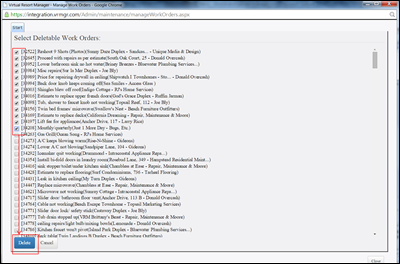
K. Deleting and Batch Deleting open work orders.
Selecting the trash can image next to an open work order entry will delete the specific work order. Selecting the 'Batch Delete' button will display a list of open work orders.
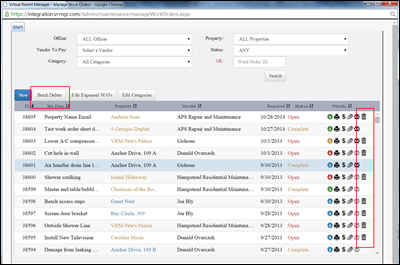
Selecting the check box next to each open work order entry and selecting the 'Delete' button will delete the batch of open work orders.
II. The following new functionality has been added when creating a new Maintenance and Housekeeping work order.
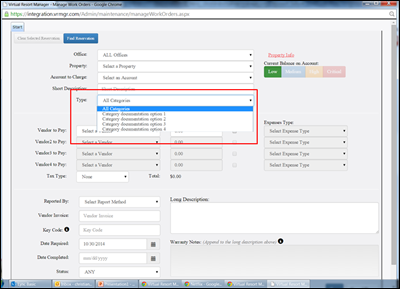
A. user Defined Category Type Drop Down Menu.As previously mentioned above, when creating a new work order or editing an existing work order a user defined category option can be assigned to a work order.
B. Applying work order Priority.When creating a new or editing an existing work order the work order's priority setting can be assigned. The work order priority options consist of; Low, Medium, High, Critical.
The priority of a new work order will default as 'Low'. Selecting a different priority option will assign the priority option selected to the work order.
The work order priority setting is color coded to allow for easy identification when viewing the work order grid. The work order grid information icon image (i) displays the corresponding work order color priority setting. Selecting the 'Priority' work order grid column header will sort work orders within the grid within ascending or descending order based on the work orders priority settings.
C. Multiple Vendor Taxable Work OrdersMultiple vendor taxable work orders can be created within the maintenance and housekeeping modules. A 'Taxable' check box has been added next to each vendor 'Amount' field. Selecting the vendor taxable check box indicates the vendor amount will be charged tax. Not all vendors have to be configured with the 'Taxable' check box selected on a multiple vendor work order.
Please keep in mind, when a vendor's 'Taxable' check box is selected a 'Tax Type' drop down menu option is required to create a work order.
D. The Management Fee drop down menu has been removed and a fourth vendor drop down menu has been added.
The work order management fee drop down menu has been removed and in its' place a fourth vendor drop down menu has been added. To apply a management fee to a work order please create a management fee vendor and apply the vendor to a work order with the corresponding management fee amount. The management vendor does not have to be selected from the fourth vendor slot. The management fee vendor can be applied as the first, second, third, or fourth vendor entry on a work order.
A management fee vendor can be created from the 'Manage Vendors' window within the 'Maintenance' menu.