Release 5.1
Includes:
New Property Management Grid
New Functionality for Prorating Daily Charges
Worker’s Comp and Liability Account Designations
Pending Work Orders Displayed on Owner Statements
Discount/Mark-up Icon
Rental Price Rollover Icon
‘Date Completed’ Added to Selected Work Order on the
‘Expensed Work Orders’ Tab
Default SD Waiver Check Box
New
Property Management Grid
Instead of having to utilize multiple menus, sub-menus,
and screens, the new Property Management Grid is one screen that will enable
you to edit the property details, owner information, and housekeeping status,
as well as view and/or edit a myriad of other nuances related to the property
itself. To access the new grid, login to
your Admin Console -> open the ‘Properties’ module -> select the
‘Property Mng Grid’.
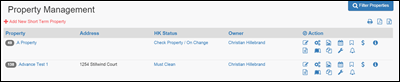
Columns
Column Headers
You can sort the information in the grid by any of the
column headers with the exception of the ‘Action’ header. Clicking on any of the other four will
automatically sort the information in the grid by that column.

Property Column
The ‘Property’ Column lists the properties that meet the
filter criteria you selected. If you
click on one of the properties, a window will open displaying details of that
property.
Address Column
The ‘Address’ Column lists the address of the
property. The addresses are not
clickable.
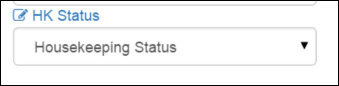
HK Status Column
The ‘HK Status’ Column shows the Housekeeping Status of
the property. If you have the correct
permissions, the Housekeeping Status are clickable and editable, which means
you can change the Housekeeping Status of a property from this grid.
Owner Column
The ‘Owner’ Column shows the property’s owner. If you have the correct permissions, the
owners’ names are clickable and editable, which means you can edit an owner’s
profile from this grid.
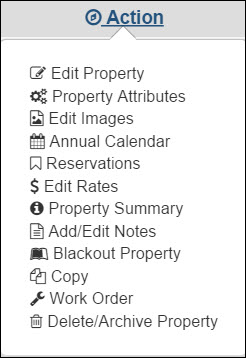
Action Column
In the ‘Action’ Column are a number of different
icons. Clicking on any of the icons
opens a new window that allows you to edit a specific aspect of that
property. All of this icons are
permissions based, meaning if an employee does not have permission to access
the module within VRM that the icon links to, the icon will not be displayed in
their grid. By mousing over the ‘Action’
header, a box will open displaying each icon and what it stands for.
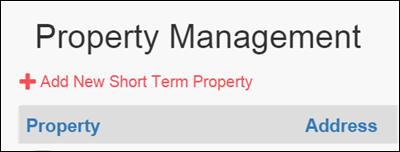
Add New Short Term Property
Clicking on the red ‘+ Add New Short Term Property’
button on the upper left-hand side of the screen opens a new window containing
fields for you to enter the information to create a new property. Keep in mind this can only be used to enter a
new short term property; long terms cannot be entered from the Property
Management Grid.
Filter Properties
Clicking the blue ‘Filter Properties’ button in the upper
right-hand corner, opens a new screen containing attributes by which to filter
the properties displayed on the screen.

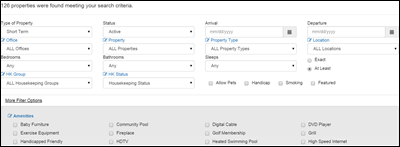
Above some of the attributes, you will notice a blue,
clickable link to the specific module that houses that attribute. If you need to access those modules to make
changes to the attributes (i.e. create a new status, edit, or delete one), you
can do so without having to leave the Property Management Grid. Simply click the link and a new window
opens.

If an employee does not have permissions for a module,
there will not be a blue link on their screen.
After you have selected the details you want to filter
by, click the blue ‘Update’ button and the refined list of properties will be
returned.
Icons above Right-hand Corner of
Grid
There are three icons above the right corner of the Grid.
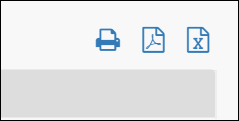
The first is a printer icon. Clicking on it will download a printable
version of the information displayed on the grid.
Clicking on the second icon will create a pdf of the
information displayed on the grid.
Clicking on the third icon will export the information
displayed on the grid into an Excel format.
Prorating
Daily Charges
A new configuration is available for use with Guest Charges,
Rent Adjustments, Owner Charges, and Management Charges which allows you to prorate charges based on length of stay. On the set-up screen for each type of charge
mentioned above, new fields will be added for you to indicate after how many
days you want a daily charge to apply.
When you set up a new charge that you want to only apply
to reservations that have exceeded a specified number of days, enter that
number of days in the ‘Auto Day Begin’ box. For example, if you enter a '7' in the 'Auto Day Begin' box, the daily charge will be begin on the 8th night. Entering a '4' in the 'Auto Day Begin' box will cause the daily charge to begin on the 5th night. Be sure ‘Greater Than’ is selected in the ‘Auto Day Type’ box. In the ‘Auto Day End’ box, enter the maximum
number of days you would want to charge the daily ammount.
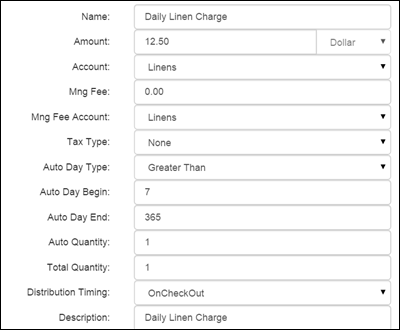
Be sure
the ‘Nightly Charge (will calculate charge on a per night basis)’ box is
checked as well as the ‘Begin nightly charge on Auto Day Begin’ box. If either of these boxes are left unchecked,
the daily rates will not be calculated correctly. Additionally, enter the maximum number
of days you would want to charge the daily rate in the ‘Max Nights:’ box. (This number should match the one entered in
the ‘Auto Day End’ box.)
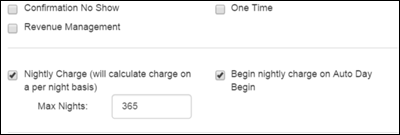
Please keep in mind if the ‘All Inclusive’, ‘Confirmation
No Show’, or ‘Revenue Management’ box is checked, this functionality will not
work, and you will not be allowed to check the ‘Begin nightly charge on Auto
Day Begin’ box.
Reservations that meet or exceed the number of days
indicated in the ‘Auto Day Begin’ box, will show the daily charge on the Price
Quote Screen, as well as other places that break down the charges.
Worker’s
Comp and Liability Account Designations
With this release, fields have been added to the ‘Vendor
Information’ screen giving you the ability to dedicate a specific percentage of
a vendor’s payment to a Worker’s Comp Account and/or a Liability Account. To access these fields, login to the Admin
Console -> Maintenance -> Manage Vendors -> Select a Vendor -> Edit

In the ‘Worker’s Comp Amount’ or ‘Liability Amount’ box
enter the percentage amount of the vendor’s payment you would like to be
distributed into the Worker’s Comp or Liability Account and be sure to check
the box beside the number to activate the process. In the ‘Worker’s Comp Account’ or ‘Liability
Account’ box, select which account the funds should be distributed in.
When a check is cut to a Vendor who has been set up with
either a Worker’s Comp Account or a Liability Account, the percentage of their
check indicated in the system will automatically be distrubted in the correct
account (as selected from the dropdown menus), and the check stub will indicate
how much was deducted from the total amount and deposited in each of the other
accounts.
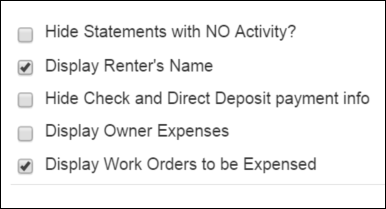
Pending
Work Orders Displayed on Owner Statements
You now have the option to include work orders that are
waiting to be expensed on Owner Statements that are mailed to your Owners. To include the “pending” work orders, you
will need to check the box next to the ‘Display Work Orders to be Expensed’
option on the ‘Owner Statements for Short-Terms’ report within the Accounting
module. (Admin Console -> Accounting
-> Reports -> Owner Statement for Short-Terms (By Property))
Work orders that fall under this heading have been
submitted for payment from the Owner’s account; however, they have not been
paid because the funds in the account are insufficient. This will be an easy way to alert the Owners
to the fact they need to deposit more money into their accounts. Please keep in mind that with Release 5.1,
this feature will only be visible on the printed version of the statements and
will not be available on the Owner Extranet.
This means that Owners checking their statements online will not see the
“pending” work orders.
Discount/Mark-up
Icon
With the release of 5.1 when you conduct a property
search using the advanced search, you can tell which properties displayed on
the Search Results Grid have already had a discount or mark-up applied to the
rent amount by the presence of a ‘$’ following their name. Properties displaying the ‘$’ have had a
discount or mark-up applied that has been set up using the discount
functionality within the Properties module.

Clicking on the ‘Desc’ in the ‘Desc’ (Description) Column
will display the property description and will include the amount of the
discount or mark-up for the dates selected.
Rental
Price Rollover Icon
An icon has been added to the ‘General’ Tab of the
Reservations screen so that when you roll over it, a pop-up displays showing
you the rental amount that shows on a Guest’s Confirmation. This amount includes not only the rental
price, as displayed in the ‘Rental Price’ box, but also any guest charges/extras
that have been configured as ‘Confirmation No Show’.
‘Date
Completed’ Added to Selected Work Order on the ‘Expensed Work Orders Tab’
Under the ‘Expensed W/O’s’ Tab in the ‘Work Orders’ menu within
the ‘Maintenance’ module, a new field has been added indicating when a Work
Order has been completed. To check the
date, select a Work Order from the ‘Expensed W/O’s’ Tab and the ‘Date Completed’
will display above the ‘Short Description’ field.

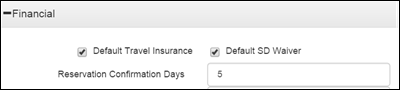
Default SD Waiver Check Box
A final piece of Release 5.1 is the addition of the ‘Default
SD Waiver Check Box’. When this box is
checked, the Security Deposit Waiver is automatically added to a
reservation. It functions the same as the
‘Default Travel Insurance’ check box does.
To locate this new check box, go to the Admin Console -> System
Configuration -> Company -> Misc Tab -> Financial
Revision 2.7